Django Tasks Manager - Free PyPi Library
A free sample project that integrates Django-TM, an open-source package for Django and Celery
Hello Coders!
This article presents an open-source sample that explains step-by-step how to use Django Tasks Manager library in a new project. The commits are made to highlight each step of the implementation starting from an empty directory up to the final phase when the project manages the tasks through UI controls. Thanks for reading!
- 👉 Django & Celery Manager - the library used
- 👉 Tasks Manager Sample - the implementation sample
- 🚀 Free Support (just in case)
What's in the box
The library used by the sample is powered by Django and Celery, a popular task queue manager, and provides a simple way to execute background tasks in full control: start/stop, view output, and runtime logs. Here is the full list of library features:
- ✅ Create/Revoke
Celery Tasks - ✅
View LOGS& Output - ✅
Minimal Configuration - ✅ Installation via
PyPi - ✅ Available TASKS (provided as starting samples)
- ✅ Task
users_in_db()- List all registered users - ✅ Task
execute_script()- let users execute system scripts
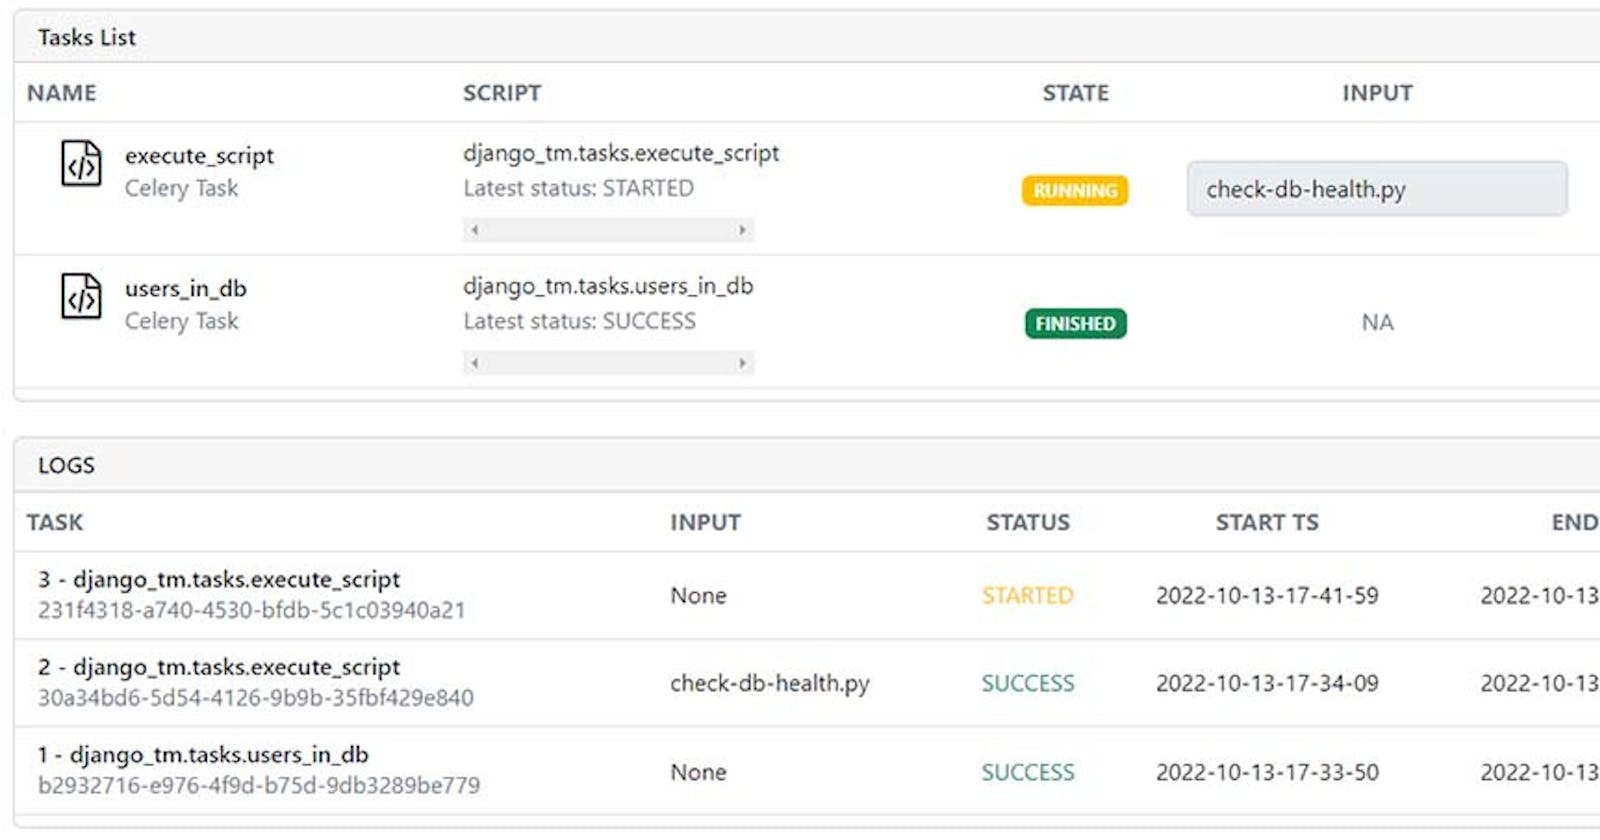
In the end, this UI exposed by the tool is similar to this:


In case this library sounds useful, the integration steps for any Django project are presented below.
An important aspect is the Redis service dependency required by Celery used to manage and tasks state tracking in real-time.
👉 Step 1 - Install
django-tasks-managervia PIP
The recommended way to do this is to use a virtual environment that isolates the installation of the library.
$ pip install django-tasks-manager
Once the installation is finished the next step is to create two directories used by the library:
celery_logs- used to log the runtime execution of the taskscelery_scripts- the location where the library search for scrips to be executed
The package ships a few simple scripts as a proof of concept available for download from the public repository.
👉 Step 2 - Update
app routing
# core/urls.py

from django.urls import path, include     # <-- UPDATE: Add 'include' HELPER

urlpatterns = [
    ...

    path("", include("django_tm.urls")),  # <-- New Routes

    ...
]
👉 Step 3 -
Update Configuration, include the new APPS
# App Settings, truncated content

INSTALLED_APPS = [
    ...
    'django_tm',              # Django Tasks Manager   # <-- NEW
    'django_celery_results',  # Django Celery Results  # <-- NEW
]
👉 Step 4 - Update Configuration,
include page templates
# App Settings, truncated content

TEMPLATE_DIR_TASKS = os.path.join(BASE_DIR, "django_tm/templates") # <-- NEW

TEMPLATES = [
    {
        'BACKEND': 'django.template.backends.django.DjangoTemplates',
        'DIRS': [TEMPLATE_DIR_TASKS],                              # <-- NEW
        'APP_DIRS': True,
    },
]
👉 Step 5 - Update Configuration, New
CELERY_Section
#############################################################
# Celery configurations

# BASE_DIR points to the ROOT of the project
# Note: make sure you have 'os' object imported
BASE_DIR = os.path.dirname(os.path.dirname(__file__))

# Working Directories required write permission
CELERY_SCRIPTS_DIR        = os.path.join(BASE_DIR, "celery_scripts" )
CELERY_LOGS_DIR           = os.path.join(BASE_DIR, "celery_logs"    )

CELERY_BROKER_URL         = os.environ.get("CELERY_BROKER", "redis://localhost:6379")
CELERY_RESULT_BACKEND     = os.environ.get("CELERY_BROKER", "redis://localhost:6379")

CELERY_TASK_TRACK_STARTED = True
CELERY_TASK_TIME_LIMIT    = 30 * 60
CELERY_CACHE_BACKEND      = "django-cache"
CELERY_RESULT_BACKEND     = "django-db"
CELERY_RESULT_EXTENDED    = True
CELERY_RESULT_EXPIRES     = 60*60*24*30 # Results expire after 1 month
CELERY_ACCEPT_CONTENT     = ["json"]
CELERY_TASK_SERIALIZER    = 'json'
CELERY_RESULT_SERIALIZER  = 'json'

#############################################################
👉 Step 6 -
Migrate the database&startthe app
$ python manage.py makemigrations
$
$ python manage.py migrate
$
$ python manage.py runserver
👉 Step 7 - Start the
Celerymanager (using another terminal)
$ celery --app=django_tm.celery.app worker --loglevel=info
The superusers now can connect to the UI and orchestrate the tasks visually at this address: http://127.0.0.1:8000/tasks

Thanks for reading!For more resources, feel free to access:
- 👉 Free Support via Email and Discord
- 👉 More free starters crafted in different technologies
🚀 PROMO (contains
affiliate links)
In case you're a junior developer or know one, this [PROMO Bundle crafted, and Discounted with 85% by Creative-Tim might be useful. The package includes a rock-solid collection of premium assets (Kits & Dashboards) that can be used to build eye-catching portfolios and web apps in no time.
👉 Junior PROMO Bundle - 24 PREMIUM Kits & Designer Files

